

ChainIDE for Full-Stack Developers: How to Build a Full-Stack dApp from Scratch?
Master Full-Stack Development and Create Your First dApp on the Blockchain


A Brief Overview
ChainIDE is an online integrated development environment (IDE) that allows developers to create and deploy smart contracts and decentralized applications (dApps) on various blockchain platforms. Here are the steps to create a full-stack dapp using ChainIDE:
Choose a blockchain platform: ChainIDE supports several blockchain platforms, including Ethereum, BNB Chain, Polygon, Flow, and others. Choose the platform that best suits your dapp’s requirements.
Create a new project: Once you have chosen the blockchain platform, create a new project in ChainIDE by selecting “New Project” from the “Templates” menu.
Write smart contracts: Use the integrated code editor to write your smart contracts in the Solidity programming language or any other language supported by your chosen blockchain platform.
Compile and deploy smart contracts: Use the built-in compiler and deployment tools to compile and deploy your smart contracts to the chosen blockchain platform.
Create the front-end: Use the front-end development tools supported by ChainIDE to create the user interface for your dapp. ChainIDE provides various libraries and frameworks, such as React and Vue.js, to simplify the front-end development process.
Connect the front end to smart contracts: Use the Web3.js library to connect your front end to the deployed smart contracts on the blockchain. This will enable your dApp to interact with the blockchain and perform various actions.
Test and debug: Use the debugging tools in ChainIDE to test and debug your dapp before deploying it to the live blockchain.
Deploy the dapp: Once you have tested and debugged your dapp, deploy it to the live server.
Monitor and update: Monitor your dapp’s performance and update it as needed to improve its functionality and user experience.
Following these steps, you can create a full-stack dapp using ChainIDE on various blockchain platforms. Let’s now move with a demo of creating a simple full-stack dApp using ChainIDE. We will use the Ethereum blockchain (Sepolia Testnet) for this demo.
What are we actually going to build today?
We are going to build a full stack dApp that will save greetings from the users to the Ethereum blockchain and show the latest greeting back to the user. Except that, we'll show the current user's wallet address and balance in that wallet address.
Prerequisites
Install the MetaMask browser extension and add the Sepolia Testnet to your network list.
Have a solid understanding of the Solidity programming language.
Be familiar with the React.js and Ether.js libraries.
Explanation
MetaMask is a browser extension that allows you to interact with Ethereum-based networks, including testnets. The Sepolia Testnet is a popular network for testing smart contracts and dapps.
Solidity is a programming language for writing smart contracts on the Ethereum blockchain. It’s important to understand Solidity well to write and deploy smart contracts.
React.js is a popular JavaScript library used for building user interfaces. Ether.js library provides a simple interface for interacting with Ethereum-based networks. Knowing these libraries will help build dapps that interact with the Ethereum network.
Create Blockend
Go to ChainIDE (https://chainide.com/).
Select “Ethereum” as the blockchain you want to use.
Choose the “Blank Template” option to start a new project.
Create a main folder called “fullstackdapp”. In this folder, create a sub-folder called “backend” to store your smart contract code written in Solidity programming language.
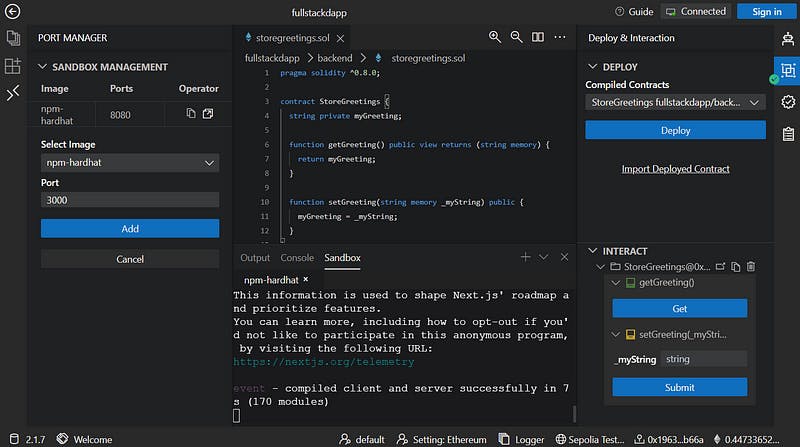
Navigate to the “Compile” mode in your preferred Solidity compiler, or press “Ctrl+S” to compile your Solidity code. This will generate the ABI (Application Binary Interface) and Byte Code for your smart contract, which is necessary for deploying the contract onto the blockchain.
Connect your MetaMask wallet to ChainIDE. Ensure that you have switched your network to “Sepolia Test Network” and have some testnet tokens available for testing. If you need help setting up your wallet and obtaining test tokens, you can follow this guide.
Click on the “Deploy” button in ChainIDE and choose the “StorGreetings” smart contract to deploy to the Sepolia Test Network. This will deploy the smart contract onto the blockchain and make it available for interaction.
Once the smart contract has been successfully deployed, you can use the ChainIDE Interact panel to interact with the deployed contract. You can call functions on the contract, view its state, and test its functionality.
Create Front-end
Now that we have deployed our smart contract and obtained its address, we can move on to developing the front-end of our application to interact with the deployed contract.
Go to the ChainIDE Sandbox, and select the “npm-hardhat” image to create a new project.
In the terminal, change the directory to the main folder, “fullstackdapp” where you have stored your Solidity contract code and other project files.
cd fullstackdapp npx create-next-app@latestName your project as “frontend” in the terminal by running the command:
npx create-react-app@latest frontend.When prompted, choose “No” for all further options. This will create a basic React project structure without any additional configuration.
Once the project is created, you can see all the files, including “index.js” and “App.js,” in your “frontend” folder. These files will be the starting point for developing your front-end application.
Open a new terminal window and navigate to the “frontend” directory by running the command:
cd frontend.Install web3 as a dependency for your React project by running the command:
npm install web3.Once web3 is installed, you can use it in your React components to interact with the deployed smart contract and perform transactions.
cd frontend
npm install web3
Open a new terminal window and navigate to the “frontend” directory by running the command: cd frontend.
Run the command
npm run devto start your React development server. This will open your application in your default web browser and allow you to test your frontend.To view your application in the ChainIDE environment, you need to create a new port and map it to the port number used by your React development server. Open the “Ports” panel in the ChainIDE environment, click “New Port,” and enter “3000” as the port number. Click “Create” to save the port configuration.
In your web browser, open a new tab and navigate to the URL of your ChainIDE workspace, followed by the port number you just created (e.g.,
https://workspace.chainide.com:3000). This will allow you to view your React application within the ChainIDE environment and test its integration with your deployed smart contract.

On the right side, we can see all the required files and libraries are added to the front-end folder. Now, we’ll visit index.js and paste the following code into that.
import Head from 'next/head'
import Image from 'next/image'
import { Inter } from 'next/font/google'
import styles from '@/styles/Home.module.css'
import React, { useState, useEffect } from "react";
import Web3 from "web3";
const MY_CONTRACT_ABI = [
{
inputs: [],
name: "getGreeting",
outputs: [{ internalType: "string", name: "", type: "string" }],
stateMutability: "view",
type: "function"
},
{
inputs: [{ internalType: "string", name: "_myString", type: "string" }],
name: "setGreeting",
outputs: [],
stateMutability: "nonpayable",
type: "function"
}
];
const MY_CONTRACT_ADDRESS = "0x8581F6a58B08BcEED7FAaeDe6CB4142F6F54Db04";
const inter = Inter({ subsets: ['latin'] })
export default function Home() {
const [address, setAddress] = useState("");
const [myString, setMyString] = useState("");
const [accounts, setAccounts] = useState([]);
const [web3, setWeb3] = useState(null);
const [balance, setBalance] = useState("");
useEffect(() => {
async function loadWeb3() {
try {
const { ethereum } = window;
if (!ethereum) {
throw new Error("No Ethereum provider found");
}
await ethereum.enable();
const web3 = new Web3(ethereum);
setWeb3(web3);
const accounts = await web3.eth.getAccounts();
setAccounts(accounts);
setAddress(accounts[0]);
const balance = await web3.eth.getBalance(accounts[0]);
const balanceInEther = web3.utils.fromWei(balance, "ether");
setBalance(balanceInEther);
} catch (error) {
console.error(error.message);
}
}
loadWeb3();
}, []);
const handleSubmit = async (event) => {
event.preventDefault();
try {
const contract = new web3.eth.Contract(
MY_CONTRACT_ABI,
MY_CONTRACT_ADDRESS
);
await contract.methods
.setGreeting(inputValue)
.send({ from: accounts[0] });
const updatedString = await contract.methods.getGreeting().call();
setMyString(updatedString);
} catch (error) {
console.error(error.message);
}
};
const getValue = async (event) => {
try {
const contract = new web3.eth.Contract(
MY_CONTRACT_ABI,
MY_CONTRACT_ADDRESS
);
const updatedString = await contract.methods.getGreeting().call();
setMyString(updatedString);
} catch (error) {
console.error(error.message);
}
};
const handleInputChange = (event) => {
setInputValue(event.target.value);
};
const [inputValue, setInputValue] = useState("");
return (
<>
<Head>
<title>Create A Fullstack dApp</title>
<meta name="description" content="ChainIDE Education" />
<meta name="viewport" content="width=device-width, initial-scale=1" />
<link rel="icon" href="/chainidelogo.ico" />
</Head>
<main className={styles.main}>
<div className={styles.description}>
<p>
Get started by editing
<code className={styles.code}>pages/index.js</code>
</p>
<div>
<a
href="https://chainide.com/"
target="_blank"
rel="noopener noreferrer"
>
By{' '}
<Image
src="/chainide.svg"
alt="Vercel Logo"
className={styles.vercelLogo}
width={100}
height={24}
priority
/>
</a>
</div>
</div>
<div className={styles.center}>
<Image
className={styles.logo}
src="/chainide.svg"
alt="Next.js Logo"
width={300}
height={100}
priority
/>
</div>
<div className={styles.update}>
<p className={styles.description} >Current wallet address: {address}</p>
<p className={styles.description} >Balance: {balance} ETH</p>
<div>
<button type="button" className={styles.button} onClick={getValue}>
Check Latest Greeting
</button>
<div className={styles.description} >Latest Greeting: {myString}</div>
</div>
<form onSubmit={handleSubmit}>
<label className={styles.description} >
Update your value:
<input
type="text"
value={inputValue}
onChange={handleInputChange}
required
/>
</label>
<button type="submit" className={styles.button}>Submit</button>
</form>
</div>
<div className={styles.grid}>
<a
href="https://chainide.gitbook.io/chainide-english-1/ethereum-ide-1/1.-ethereum-ide/quick-demo"
className={styles.card}
target="_blank"
rel="noopener noreferrer"
>
<h2 className={inter.className}>
Create <span>-></span>
</h2>
<p className={inter.className}>
Create your smart contract using ChainIDE.
</p>
</a>
<a
href="https://chainide.gitbook.io/chainide-english-1/ethereum-ide-1/1.-ethereum-ide/quick-demo"
className={styles.card}
target="_blank"
rel="noopener noreferrer"
>
<h2 className={inter.className}>
Compile & Deploy <span>-></span>
</h2>
<p className={inter.className}>
Compile your smart contracts to ChainIDE integrated compiler and deploy to any blockchain that suits you!
</p>
</a>
<a
href="https://chainide.gitbook.io/chainide-english-1/ethereum-ide-1/1.-ethereum-ide/quick-demo"
className={styles.card}
target="_blank"
rel="noopener noreferrer"
>
<h2 className={inter.className}>
Interact <span>-></span>
</h2>
<p className={inter.className}>
Interact with the deployed smart contract using ChainIDE built-in interaction panel or build your own interface using React in ChainIDE.
</p>
</a>
<a
href="https://chainide.gitbook.io/chainide-english-1/ethereum-ide-1/1.-ethereum-ide/quick-demo"
className={styles.card}
target="_blank"
rel="noopener noreferrer"
>
<h2 className={inter.className}>
Deploy <span>-></span>
</h2>
<p className={inter.className}>
Create your amazing dApps.
</p>
</a>
</div>
<footer className={styles.footer}>
Made with ❤ by ChainIDE
</footer>
</main>
</>
)
}
Don’t forget to change the followings:
MY_CONTRACT_ABI
MY_CONTRACT_ADDRESS
The code uses ABI and contract addresses to interact with the deployed smart contract. You can add some CSS to this code to make it look good.
Here is what we added.
.main {
  display: flex;
  flex-direction: column;
  justify-content: space-between;
  align-items: center;
  padding: 6rem;
  min-height: 100vh;
}

.description {
  display: inherit;
  justify-content: inherit;
  align-items: inherit;
  font-size: 0.85rem;
  max-width: var(--max-width);
  width: 100%;
  z-index: 2;
  font-family: var(--font-mono);
}

.description a {
  display: flex;
  justify-content: center;
  align-items: center;
  gap: 0.5rem;
}

.description p {
  position: relative;
  margin: 0;
  padding: 1rem;
  background-color: rgba(var(--callout-rgb), 0.5);
  border: 1px solid rgba(var(--callout-border-rgb), 0.3);
  border-radius: var(--border-radius);
}

.code {
  font-weight: 700;
  font-family: var(--font-mono);
}

.grid {
  display: grid;
  grid-template-columns: repeat(4, minmax(25%, auto));
  width: var(--max-width);
  max-width: 100%;
}

.footer {
  display: flex;
  padding: 2rem 0;
  border-top: 1px solid #eaeaea;
  justify-content: center;
  align-items: center;
}
.card {
  padding: 1rem 1.2rem;
  border-radius: var(--border-radius);
  background: rgba(var(--card-rgb), 0);
  border: 1px solid rgba(var(--card-border-rgb), 0);
  transition: background 200ms, border 200ms;
}

.card span {
  display: inline-block;
  transition: transform 200ms;
}

.card h2 {
  font-weight: 600;
  margin-bottom: 0.7rem;
}

.card p {
  margin: 0;
  opacity: 0.6;
  font-size: 0.9rem;
  line-height: 1.5;
  max-width: 30ch;
}

.center {
  display: flex;
  justify-content: center;
  align-items: center;
  position: relative;
  padding: 4rem 0;
}

.center::before {
  background: var(--secondary-glow);
  border-radius: 50%;
  width: 480px;
  height: 360px;
  margin-left: -400px;
}

.center::after {
  background: var(--primary-glow);
  width: 240px;
  height: 180px;
  z-index: -1;
}

.center::before,
.center::after {
  content: '';
  left: 50%;
  position: absolute;
  filter: blur(45px);
  transform: translateZ(0);
}

.logo,
.thirteen {
  position: relative;
}

.thirteen {
  display: flex;
  justify-content: center;
  align-items: center;
  width: 75px;
  height: 75px;
  padding: 25px 10px;
  margin-left: 16px;
  transform: translateZ(0);
  border-radius: var(--border-radius);
  overflow: hidden;
  box-shadow: 0px 2px 8px -1px #0000001a;
}

.thirteen::before,
.thirteen::after {
  content: '';
  position: absolute;
  z-index: -1;
}

/* Conic Gradient Animation */
.thirteen::before {
  animation: 6s rotate linear infinite;
  width: 200%;
  height: 200%;
  background: var(--tile-border);
}

/* Inner Square */
.thirteen::after {
  inset: 0;
  padding: 1px;
  border-radius: var(--border-radius);
  background: linear-gradient(
    to bottom right,
    rgba(var(--tile-start-rgb), 1),
    rgba(var(--tile-end-rgb), 1)
  );
  background-clip: content-box;
}

/* Enable hover only on non-touch devices */
@media (hover: hover) and (pointer: fine) {
  .card:hover {
    background: rgba(var(--card-rgb), 0.1);
    border: 1px solid rgba(var(--card-border-rgb), 0.15);
  }

  .card:hover span {
    transform: translateX(4px);
  }
}

@media (prefers-reduced-motion) {
  .thirteen::before {
    animation: none;
  }

  .card:hover span {
    transform: none;
  }
}

/* Mobile */
@media (max-width: 700px) {
  .content {
    padding: 4rem;
  }

  .grid {
    grid-template-columns: 1fr;
    margin-bottom: 120px;
    max-width: 320px;
    text-align: center;
  }

  .card {
    padding: 1rem 2.5rem;
  }

  .card h2 {
    margin-bottom: 0.5rem;
  }

  .center {
    padding: 8rem 0 6rem;
  }

  .center::before {
    transform: none;
    height: 300px;
  }

  .description {
    font-size: 0.8rem;
  }

  .description a {
    padding: 1rem;
  }

  .description p,
  .description div {
    display: flex;
    justify-content: center;
    position: fixed;
    width: 100%;
  }

  .description p {
    align-items: center;
    inset: 0 0 auto;
    padding: 2rem 1rem 1.4rem;
    border-radius: 0;
    border: none;
    border-bottom: 1px solid rgba(var(--callout-border-rgb), 0.25);
    background: linear-gradient(
      to bottom,
      rgba(var(--background-start-rgb), 1),
      rgba(var(--callout-rgb), 0.5)
    );
    background-clip: padding-box;
    backdrop-filter: blur(24px);
  }

  .description div {
    align-items: flex-end;
    pointer-events: none;
    inset: auto 0 0;
    padding: 2rem;
    height: 200px;
    background: linear-gradient(
      to bottom,
      transparent 0%,
      rgb(var(--background-end-rgb)) 40%
    );
    z-index: 1;
  }
}

/* Tablet and Smaller Desktop */
@media (min-width: 701px) and (max-width: 1120px) {
  .grid {
    grid-template-columns: repeat(2, 50%);
  }
}

@media (prefers-color-scheme: dark) {
  .vercelLogo {
    filter: invert(1);
  }

  .logo,
  .thirteen img {
    filter: invert(1) drop-shadow(0 0 0.3rem #ffffff70);
  }
}

@keyframes rotate {
  from {
    transform: rotate(360deg);
  }
  to {
    transform: rotate(0deg);
  }
}
Interact with your smart contract using the interface you just built:
That’s all you need to do. Now visit the hardhat sandbox again, go to the front-end directory, and type.
npm run dev
And you’ll be able to see something similar to the one shown below.

Click here to check the complete source code for this dApp. We have deployed this dApp to Vercel. To check how it looks, visit here. If you find this article useful, please share it with your friends and consider some claps. Thanks
Should there be any questions, please reach us at the below-given links. Thanks.
Twitter | Telegram | Discord | YouTube